Hardening Proxmox VE management interface with 2FA, reverse proxy and Let's Encrypt
Proxmox VE
Proxmox Virtual Environment (Proxmox VE) is an open-source server virtualization management platform.
The context is self-hosting services for personal use, I have been using it for over 5 years and counting!
Goal
Out of the box the Proxmox Virtual Environment management web ui is only protected by a login form.
The scope of this post is to improve its security, besides the obvious strong credentials.
Note: The safest option would be to not expose this interface on Internet and restrict its access through a vpn or a ssh tunnel, but in case these have been lost (broken laptop?) I prefer this last resort option over rebooting the whole host in rescue mode.
Steps
The plan is to:
- Enable Two-factor authentication (2FA) for the default root user.
- Use a Let’s encrypt TLS certificate instead of the self-generated one, to get rid of the browser warnings/exception.
- Handle the Let’s encrypt renewal challenges through DNS, fully automated with Gandi Live DNS API
- Hide the management web ui behind a reverse proxy to:
- add another basic HTTP authentication layer.
- change the default 8006 port to 443.
- do not leak a Proxmox node is running there :)
I’ll use the command line as much as possible so it’s easier to onboard these steps to a configuration management system like Ansible, though I won’t share any Ansible snippets because it’s too tied to my whole setup.
ℹ️ Most of these steps should also be doable through the web ui.
Safety reasons?
One may argue the reverse proxy is just security by obscurity, however I don’t like to expose various services endpoints over the Internet because:
- All software have bugs, therefore restricting endpoints through a single one reduces the attack surface, plus is easier to audit/update/restrict.
- The additional basic HTTP authentication, in addition to add another layer of safety avoid revealing what services are running on the host: the IPv4 space is continuously scanned, and any known service/version found is at some point stored in some script kiddie records waiting for the next 0-day/CVE vulnerability to quickly exploit your host.
The root user
Also I’ll keep using the root user in the web ui, as unfortunately disabling the root user seems to lead to issues
The root user can’t be deleted as per the documentation so I’ll just keep it:
The system’s root user can always log in via the Linux PAM realm and is an unconfined administrator. This user cannot be deleted, but attributes can still be changed and system mails will be sent to the email address assigned to this user.
The setup
While writing this post:
- Online.net default install of
Proxmox VE 6.2-15 - The Proxmox VE web management http endpoint will be referred as
https://pve.yourdomain.invalid:8006(just to be nice to not use any existing domain here)
Enable two-factor authentication
We will set up the root user with TOTP Time-based One-Time password - This is a well documented process
Note the order: first the root user will be assigned an OATH key, then TFA will be activated in the associated authentication realm.
Description of the commands below - pveum(1) can come in handy.
- ssh to
pve.yourdomain.invalid - Install qrencode to ease the key transfer to your favorite 2FA apps
- Generate an OATH key and assign it to the root user
- Check the key has been correctly assigned:
|
|
- Copy the key to your 2FA apps, I personally use:
- Unix systems: pass with the pass-totp extension as I’ve described in another article
- Android - Aegis
- To ease the process a qrcode will be generated:
|
|
- Keep a ssh session opened on your proxmox host, just in case something goes wrong with the TFA authentication, to avoid locking yourself out of your host (if that happen, comment out the line
tfa type=oathunder the pam section in/etc/pve/domains.cfg) - Enable TFA on the authentication Realm used for the root user which is pam
|
|
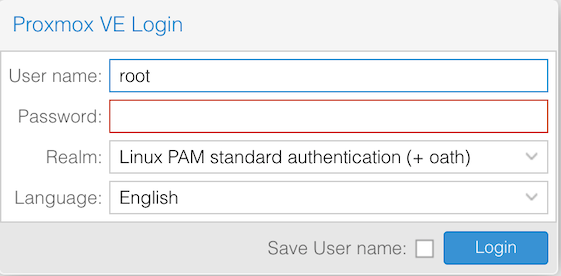
- Now try to connect to the management web ui at https://pve.yourdomain.invalid:8006, you should see the login form reflecting the Realm update as shown below
(+ oath)
Right after entering the password you will get the TOTP key prompt:
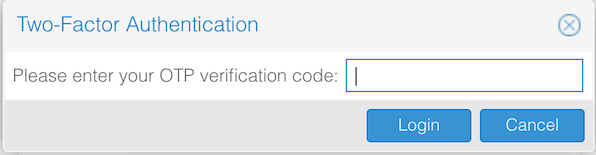
And we are done for the tfa part \o/
Create a Let’s Encrypt TLS certificate
The benefit of using internal Proxmox tooling to deal with the certificates vs manually installing certbot, is that they will automatically be renewed by Proxmox, no need to deal with cron jobs or webserver reload to load the new certificate files as described in the certificate management section of the PVE admin guide:
Automatic renewal of ACME certificates
If a node has been successfully configured with an ACME-provided certificate (either via pvenode or via the GUI), the certificate will be automatically renewed by the pve-daily-update.service. Currently, renewal will be attempted if the certificate has expired already, or will expire in the next 30 days.
Register a Let’s Encrypt account
First you need to register a Let’s Encrypt account as mentioned in the documentation
This is achieved with the command pvenode acme account register default myemail@yourdomain.invalid
|
|
Check the default Let’s Encrypt account has been created:
|
|
Certificate challenge with Gandi DNS live API
Why the dns-01 verification challenge and not the http-01 one?
Because the http-01 challenge type would require to expose the port 80 to the wild Internet as found in:
https://letsencrypt.org/docs/challenge-types/
|
|
And we don’t want that, because it will fail, blocked by the basic http auth that we will add a bit later.
Retrieve your Gandi livedns token
- Log into your Gandi account
- On your profile open User settings then on Change password & configure access restrictions
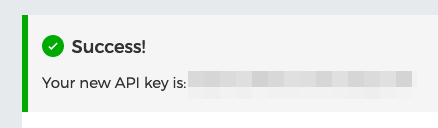
- Generate or regenerate your API key
Create a new ACME plugin config
- Write your API key to a file, as this the way it has to be consumed later:
|
|
- Add a new
gandiACME plugin configuration fed with that token:
|
|
⚠️ Here you can replace gandi with whatever you want like e.g. vegetables_rock it won’t matter
- Check it has been registered correctly:
|
|
So now we have a valid gandi ACME plugin configuration entry setup with our Gandi API key, that could be used to verify the challenge when ordering new certificates.
Configure and order your first certificate
Here we are going to configure and request a certificate for pve.yourdomain.invalid, replace with any Gandi domains you own.
- Add a new configuration with our domain and our previously setup
gandiplugin config:
|
|
- Finally (🤪) order the certificate - you will be thrilled to notice the validation through the dns challenge with our Gandi api key, provisioning a TXT record:
|
|
The Let’s encrypt certificated has been generated and the management web ui reloaded to take it into account. Reload the page to enjoy your new valid Let’s Encrypt certificate!
To get details about the certificates that have been generated (for our next Nginx setup), use the pvenode cert info command.
In addition to all the default certificates, you will find the new one toward the bottom:
|
|
The full path of the certificate file and its key are:
/etc/pve/local/pveproxy-ssl.pem/etc/pve/local/pveproxy-ssl.key
Reverse proxy setup
Nginx configuration
Basically following the instructions from the official wiki -Web Interface Via Nginx Proxy plus my additional auth basic twist:
- Install the basic version of Nginx and not the full-featured one:
|
|
- Overwrite the default config file
/etc/nginx/sites-available/defaultwith the snippet below, my additional twists are under the comment at the bottom of thelocationblock, with are the additional http basic auth and avoid leaking the Nginx version:
|
|
- Generate the
/etc/nginx/.htpasswdfile:
|
|
- Check config and restart Nginx:
|
|
The Proxmox management web ui is now reachable through https://pve.yourdomain.invalid with the Let’s Encrypt certificate.
Restrict access to pveproxy port 8006
Last but not least, the port 8006 should only be reachable through Nginx, therefore not exposed on https://pve.yourdomain.invalid:8006 otherwise the whole reverse proxy trick is pointless.
Unfortunately I did not find any way to configure the interfaces this daemon is listening on :(
What could be done:
- Configure
pveproxyACLs to deny anything but traffic coming from 127.0.0.1 (Nginx) - Use the Proxmox firewall to block port tcp/8006
pveproxy ACL
Configure pveproxy ACL through /etc/default/pveproxy, refer to pveproxy(8) for more details:
|
|
This can be tested by starting pveproxy in debug mode with pveproxy start --debug 1 and validate the traffic is correctly accepted/denied when reaching https://pve.yourdomain.invalid or https://pve.yourdomain.invalid:8006
|
|
PVE firewall
This step is so specific to your setup that there is no one size fits all solution, and there is already a lot of good documentation in the Proxmox documentation or wiki, so I won’t duplicate the contents here. (links below)
However on my setup this is what I did to only allow ssh and https traffic to the external ip of my Proxmox host:
- Datacenter>Firewall level:
- Add/enable 2 new
inACCEPTrules for the macrosHTTPSandSSHwith your public pve host IP as destination
- Datacenter>Firewall>Options level:
- Set
Firewallto yes
- Datacenter>yournode>Firewall>Options level:
- Set
Firewallto yes - Enable firewall logs at the info level:
log_level_into info
Quickly check your firewall rules from a distant host, for example with netcat testing if the ports 80, 443, 8006 are reachable or not:
|
|
As desired, only 443 (https) is open.
Now, you can as expected:
- reach your PVE web management interface at
https://pve.yourdomain.invalid, bound with a valid SSL certificate - have to go through the first http auth basic authentication - hidding the fact a PVE web ui is behind
- have to go through the regular Proxmox login
- and finally have to provide the two factor authentication token :)
Hope this post was useful!
Resources
The most up to date Proxmox documentation is Proxmox VE Documentation Index
- https://api.gandi.net/docs/livedns/
- https://pve.proxmox.com/pve-docs/chapter-pve-firewall.html
- https://pve.proxmox.com/pve-docs/pve-admin-guide.html#sysadmin_certificate_management
- https://pve.proxmox.com/wiki/Firewall
- https://pve.proxmox.com/wiki/Certificate_Management
- https://pve.proxmox.com/wiki/Web_Interface_Via_Nginx_Proxy
- https://pve.proxmox.com/pve-docs/pvenode.1.html
- ACME Gandi plugin:
/usr/share/proxmox-acme/dnsapi/dns_gandi_livedns.sh - PVE local node configuration file:
/etc/pve/local/config - pvenode(1)
- pveum(1)
- pveproxy(8)
- https://www.reddit.com/r/Proxmox/comments/ed0u7h/question_about_the_pvenode_config_set_command/
- Nginx - restricting Access with HTTP Basic Authentication